
Carve
Carve cuts a pocket for one shape, the target, into another, the host. The pocket is the target grown by the Offset, and the target keeps rendering inside it.
Carve buttons
Carve in the pie (South) and in the right-click Modifiers menu carves every selected Chisel shape into the active one, the host. Each selected shape becomes the target of a new Carve with an Offset of 0.1, and:
- keeps rendering, in its own material;
- becomes a child of the host, if it had no parent;
- stays selected, the first one active.
Pressing ' or ; with a Boolean cutter selected can also turn its join into a Carve. The shape renders while it is a carve target and is hidden again if it goes back to being a cutter. Add Modifier in the panel adds an empty Carve; you then pick its Target in the panel.
Target
The pocket is cut with the target’s solid shape. Holes that the target’s own Difference, Solidify or Carve make in it are ignored, so a hollow target cuts the same pocket as a solid one. An Intersect, Bisect or Engrave on the target does change the pocket. The target itself still renders with all its modifiers. Because it renders, it has no cutter outline.
Offset
Offset is the gap between the target and the pocket wall: the pocket is larger than the target by this distance on every side. At 0 the pocket is exactly the target’s size.
Besides the panel field, you can drag the offset in the viewport from:
- the azure Carve arc next to a selected target;
- Offset in the pie’s South-West wedge or the right-click menu, with a carve target selected;
- the offset value on the Carve’s row in the pie’s East wedge, with the host active.
Moving the mouse away from the host makes the gap wider. Hold Shift for finer steps and Ctrl to snap to 0.1 (Ctrl + Shift: 0.01). Click, Enter or Space confirms; Esc or right-click puts the old value back. If the selected target is used by several Carves, they all change together.
Blend
The rim of the pocket can be filleted like a Boolean seam, with Blend, Profile, Outer and Smooth, or with Ctrl + B and the blue Blend arc while the target is selected. A Carve has no Material Blend: the pocket always has the host’s colour.
Settings
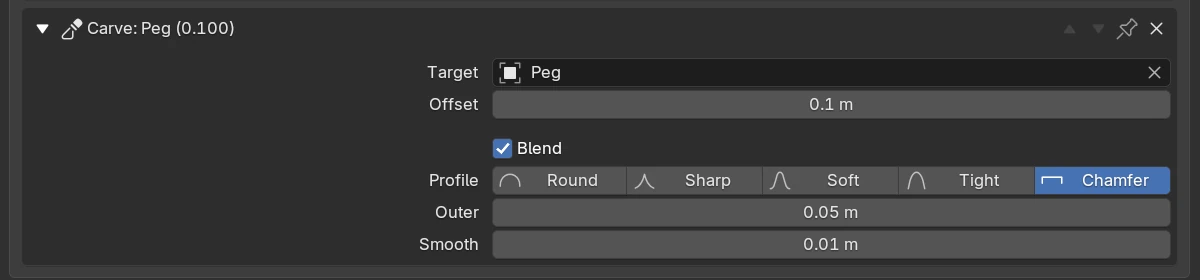
| Setting | Default | Range | What it does |
|---|---|---|---|
| Expand arrow | closed | Shows or hides the settings. | |
| Header | Carve:, the target and the offset, e.g. Carve: Peg (0.100); (no target) in red when the target was deleted. | ||
| Move up, Move down | Move the Carve in the stack. | ||
| Pin | off | Keep the Carve at the end of the stack. | |
Remove (X) | Delete the Carve. | ||
| Target | none | any Chisel shape but the host | The shape the pocket is cut for. |
| Offset | 0.1 m | 0 and up (soft max 2) | The gap between the target and the pocket wall. |
| Blend | off | Fillet the rim. | |
| Profile | Round | Round, Sharp, Soft, Tight, Chamfer | The fillet’s profile. Shown with Blend on. |
| Outer | 0 m | 0 and up (soft max 2) | The fillet radius. Shown with Blend on. |
| Smooth | 0 m | 0 and up (soft max 0.5) | Rounds the two edges of a Chamfer fillet. Shown on Chamfer. |
Viewport handles
| Handle | Looks like | Drag or click | Keys while dragging |
|---|---|---|---|
| Carve arc | an azure arc, bottom right of a selected target, the outermost | Drag outward: a larger Offset | Shift precision, Ctrl snap |
| Blend arc | a blue arc, inside the Carve arc | Drag outward: a wider rim blend | Shift, Ctrl, 1–5 profile, S Smooth |
| Target dot | an azure dot at the target’s origin. Off by default | Click: select the target | none |
In the menus
- Pie
Q, South: Carve, after Emboss and Engrave. - Pie, East, with the host active: the Carve’s profile icons, blend radius, Smooth, offset and target name.
- Pie, South-West, with a carve target selected: the blend profile icons, Blend, Smooth on Chamfer, then Offset.
- Right-click, with a carve target selected: Blend Profiles ▸, Blend, Smooth on Chamfer, then Offset.
- Tape tree: a carve target is listed under the host with ∨.
Limits and known issues
Mesh targets
With a Mesh shape as target, keep Offset plus the blend within its Field Margin, or raise the margin and press Rebake SDF.
See also
- Boolean, Emboss & Engrave: the other joins
- Blending
- Apply Modifiers: applying a Carve does not delete its target