
Block Mode
Block mode is the Chisel tool’s blockout gesture: a drag draws a base on a surface, the mouse sets the height, and a click keeps the shape. It draws an Ngon box or a Cylinder, which can bevel, round and blend into the shapes it cuts while you draw.
The tool settings row in Block mode

Shape
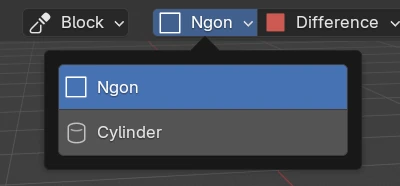
| Shape | What Block draws |
|---|---|
| Ngon (default) | A box of four corners. In Edit each corner can move and take its own rounding afterwards |
| Cylinder | A circle pulled to a height |
Operation
What the new shape does to the selected Chisel shapes, the same setting as in Create mode, see Chisel Tool ▸ Operation.
Difference needs a selected shape
The Operation starts at Difference. Every operation except Add joins the new shape into the selected Chisel shapes, so with none selected a drag draws nothing and the status bar says “Chisel Difference needs at least one selected Chisel SDF object — select a target, or switch the tool’s operation to Add.” Pick Add to draw a shape on its own.
Align
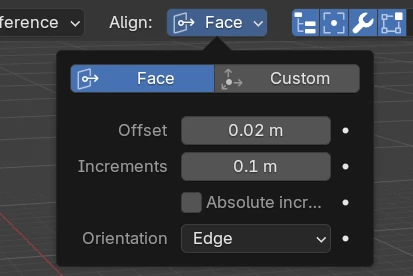
| Setting | Default | Range | What it does |
|---|---|---|---|
| Face / Custom | Face | Face: the base lies on the face under the cursor (the selected shapes first, then anything visible; a world plane over empty space). Custom: the base lies on the custom plane | |
| Offset | 0.02 m | 0 – soft 1 | Lifts the new shape off the drawing plane when it joins another shape, so a cut never sits exactly on the surface. An Add ignores it |
| Increments | 0.1 m | 0.0001 – soft 10 | The Ctrl snap step for the base size and the height |
| Absolute increments snap | off | Snaps the press point to the custom plane’s grid of Increments | |
| Orientation (Face) | Edge | Edge, Planar | The base’s X direction on a face. Edge: along the face edge closest to the cursor. Planar: from the face normal and the world up axis |
| Location (Custom) | 0, 0, 0 | The custom plane’s origin | |
| Rotation (Custom) | 0°, 0°, 0° | The custom plane’s turn: its Z is the plane’s normal, its X the draw direction |
The custom plane
Space in Block mode sets the custom plane from what is under the cursor and switches Align to Custom: from the vertex, edge or face of a shape or mesh, or, over empty space, from the world plane facing the view through the world origin. Space again switches back to Face.
While Custom is on, the plane’s X and Y axes show in the view (colours: Preferences ▸ Theme ▸ Block Axes), and a press within 30 pixels of an axis snaps onto it.
The gesture
| Phase | Starts with | The mouse sets | Ends with |
|---|---|---|---|
| Base | A left drag | The far corner of the base (Ngon), or its radius (Cylinder) | Releasing the button |
| Height | The release | The height, above or below the surface | A click, Enter or Space: the shape is kept |
| Rounding | B or Ctrl + B | The bevel, rounding or blend | A click, Enter or Space: back to the phase B was pressed in |
With a cutting operation the new shape cuts every selected Chisel shape from the moment the height starts, so a Difference opens its pocket as you pull. RMB or Esc cancels the whole gesture. When the shape is kept, the selection stays as it was, unless Q is held.
Bevel, rounding and blend
| Value | Shape | Key | What it rounds |
|---|---|---|---|
| Bevel | Ngon | B, in either phase | The four upright corners, all alike |
| Rounding | Ngon | B again, once there is a height | The top edges |
| Rounding | Cylinder | B, once there is a height | The top edge |
| Blend | both | Ctrl + B, once there is a height | The fillet where the new shape joins each selected shape (not with Add) |
Rounding rounds only the top, the end away from the surface. To keep the base full size, the shape reaches below its base by the rounding amount, hidden inside the surface it stands on.
Rounding in empty space
Drawn in empty space, a shape with Rounding shows that extra, rounded part below the grid.
Keys
| Key | Base | Height | Rounding phase |
|---|---|---|---|
| Release, click | Starts the height | Keeps the shape | Leaves the phase |
Enter, Space | Starts the height | Keeps the shape | Leaves the phase |
B | Ngon: Bevel | Bevel or Rounding | Switches Bevel / Rounding (Ngon) |
Ctrl + B | The cut’s Blend | The cut’s Blend | |
X / Y | Mirrors the base about the press point (Ngon) | ||
Z | Both ways from the plane | Both ways from the plane | |
1 – 5, wheel | Profile: Round, Sharp, Soft, Tight, Chamfer | ||
S | Chamfer: switches to Smooth and back | ||
Q held | Selects the new shape when it is kept | ||
Ctrl | Snaps to Increments | Snaps to Increments | Snaps to 0.1 (Ctrl + Shift: 0.01) |
Shift | Ten times finer | Ten times finer | Ten times finer |
| Middle mouse | Orbits | Orbits | |
RMB, Esc | Cancels | Cancels | Cancels |
Ctrl inverts Blender’s snapping toggle while held: with snapping on in the header, Ctrl turns it off.
On screen
| What | Shows |
|---|---|
| Face tint | The operation’s colour: dark red Difference, green Union, teal Intersect, yellow Slice, orange Carve, pink Emboss and Engrave; grey for an Add while the base is drawn |
| Labels | X and Y (the Ngon’s base), R (the Cylinder’s radius), Z (the height), and the bevel, rounding or blend value |
| Guides | The X and Y axes through the press point while drawing the base, the Z axis while pulling the height |
| Status bar | The phase’s keys, see Status Bar & Messages |
The redo panel
After a shape is kept, the redo panel (bottom left of the view, or F9) holds every value of the gesture. Changing one rebuilds the shape.
| Setting | Shape | What it does |
|---|---|---|
| Dimensions | Ngon | The far corner of the base, X and Y on the drawing plane |
| Z / Dimensions Z | Ngon / Cylinder | The height (negative: below the plane) |
| Radius | Cylinder | The base radius |
| Symmetry X, Y, Z | X, Y: Ngon | X and Y mirror the base about its start; Z extrudes both ways |
| Offset | both | The new shape’s lift off the plane |
| Bevel + profile, Smooth | Ngon | The corners’ rounding, its profile, and a chamfer’s smoothing |
| Rounding + profile, Smooth | both | The top’s rounding, its profile, and a chamfer’s smoothing |
| Operation | both | Add, Difference, Union, Intersect, Slice, Emboss, Engrave, Carve |
| Blend + profile, Smooth | both | The cut’s blend (not with Add) |
| Reveal | both | Selects the new shape and makes it active |
Smooth rows show only on a Chamfer profile.